Connecting your dispense system
Connect Light to your dispense system so you can search your dispense records, add customers to Light, and keep their dispense history up to date automatically.
Connect Light to your dispense system so you can search for customers in your dispense records and add them to Light. Once a customer is linked, their dispense history stays up to date automatically – which also means their medicines are ready to pull into services like MedsCheck.
Before you connect, your dispense vendor must grant Light access:
- Minfos – raise a ticket with Minfos to request it
- Fred Dispense Plus – request access in the Fred App Store
Checking your connection
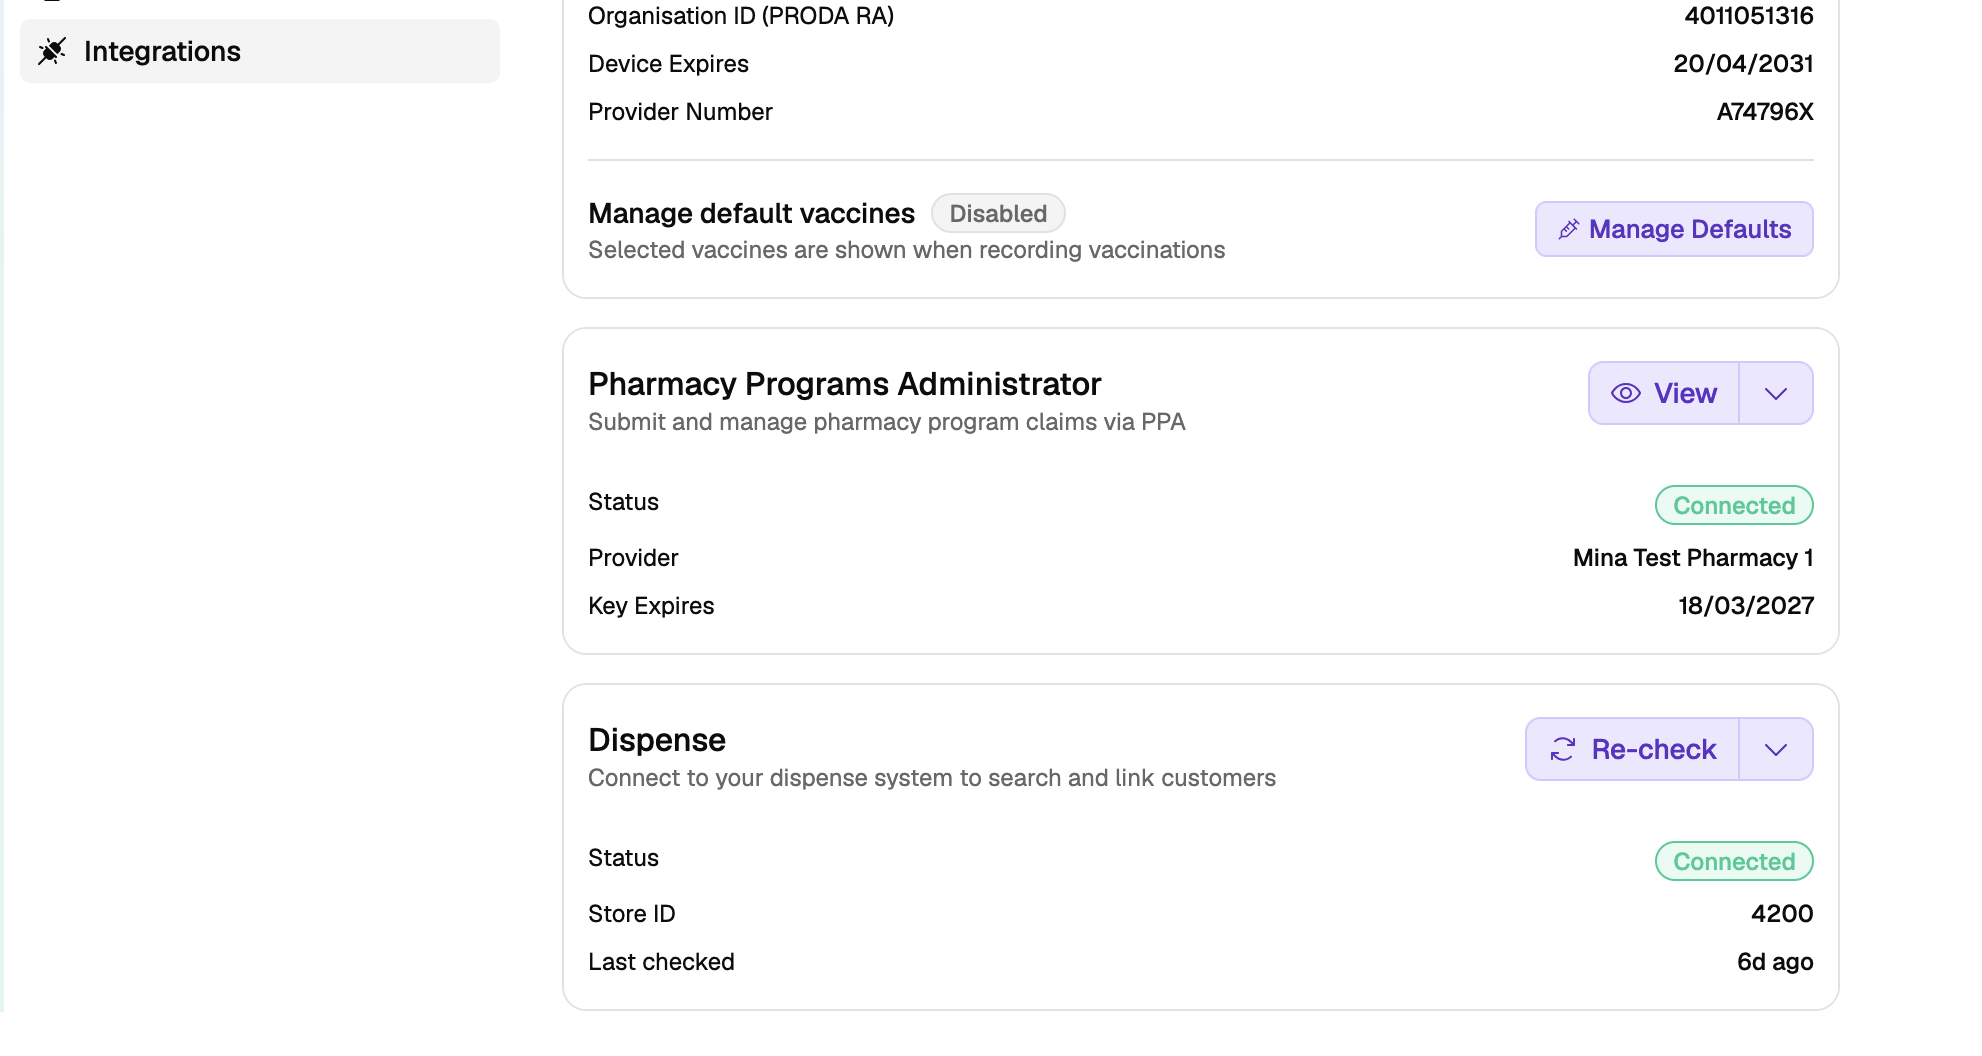
Go to Settings›Integrations›Dispense to see your connection. The Dispense card shows:
- Status – whether the connection is active
- Store ID – the store the connection is linked to (Minfos)
- Last checked – when the connection was last verified
- Re-check – re-tests the connection on demand
Setting up the connection
The setup process depends on your dispense vendor.
For Minfos
- Request access from Minfos
Raise a ticket with Minfos to grant Light access, following their guide, How to Request External Vendor Access to Your Store's Data via Cloud API.
- Light completes the connection
Once Minfos has granted access, the Light Support team completes the connection for you.
- Start using dispense
Once connected, you can search for customers in your dispense records, add them to Light, and link them to their dispense record.
For Fred Dispense Plus
- Open the App Store
In Fred Dispense Plus, select the Integrations cog at the bottom right of the screen, under the AppBar, then select Add/Remove.
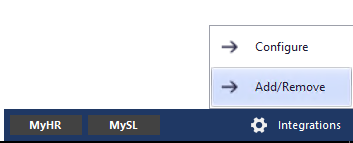
Select the Integrations cog, then Add/Remove. - Add Light
Find the Light integration tile and select Add. An embedded request form opens – complete and submit it. For more on the App Store, see Fred's guide, App Store.
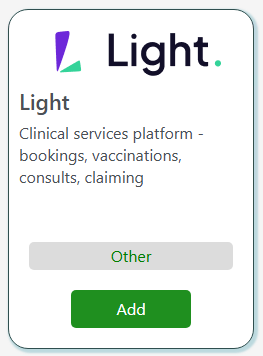
Find the Light tile and select Add. - Fred generates your API key
Once you submit the form, Fred generates an API key and provides the access details to the Light Support team.
- Light completes the connection
The Light Support team completes the connection for you. You should receive confirmation once integration access has been enabled.
- Start using dispense
Once connected, you can search for customers in your dispense records, add them to Light, and link them to their dispense record.
Testing the connection
Confirm the connection the same way for all dispense vendors:
- Add a customer who exists in dispense
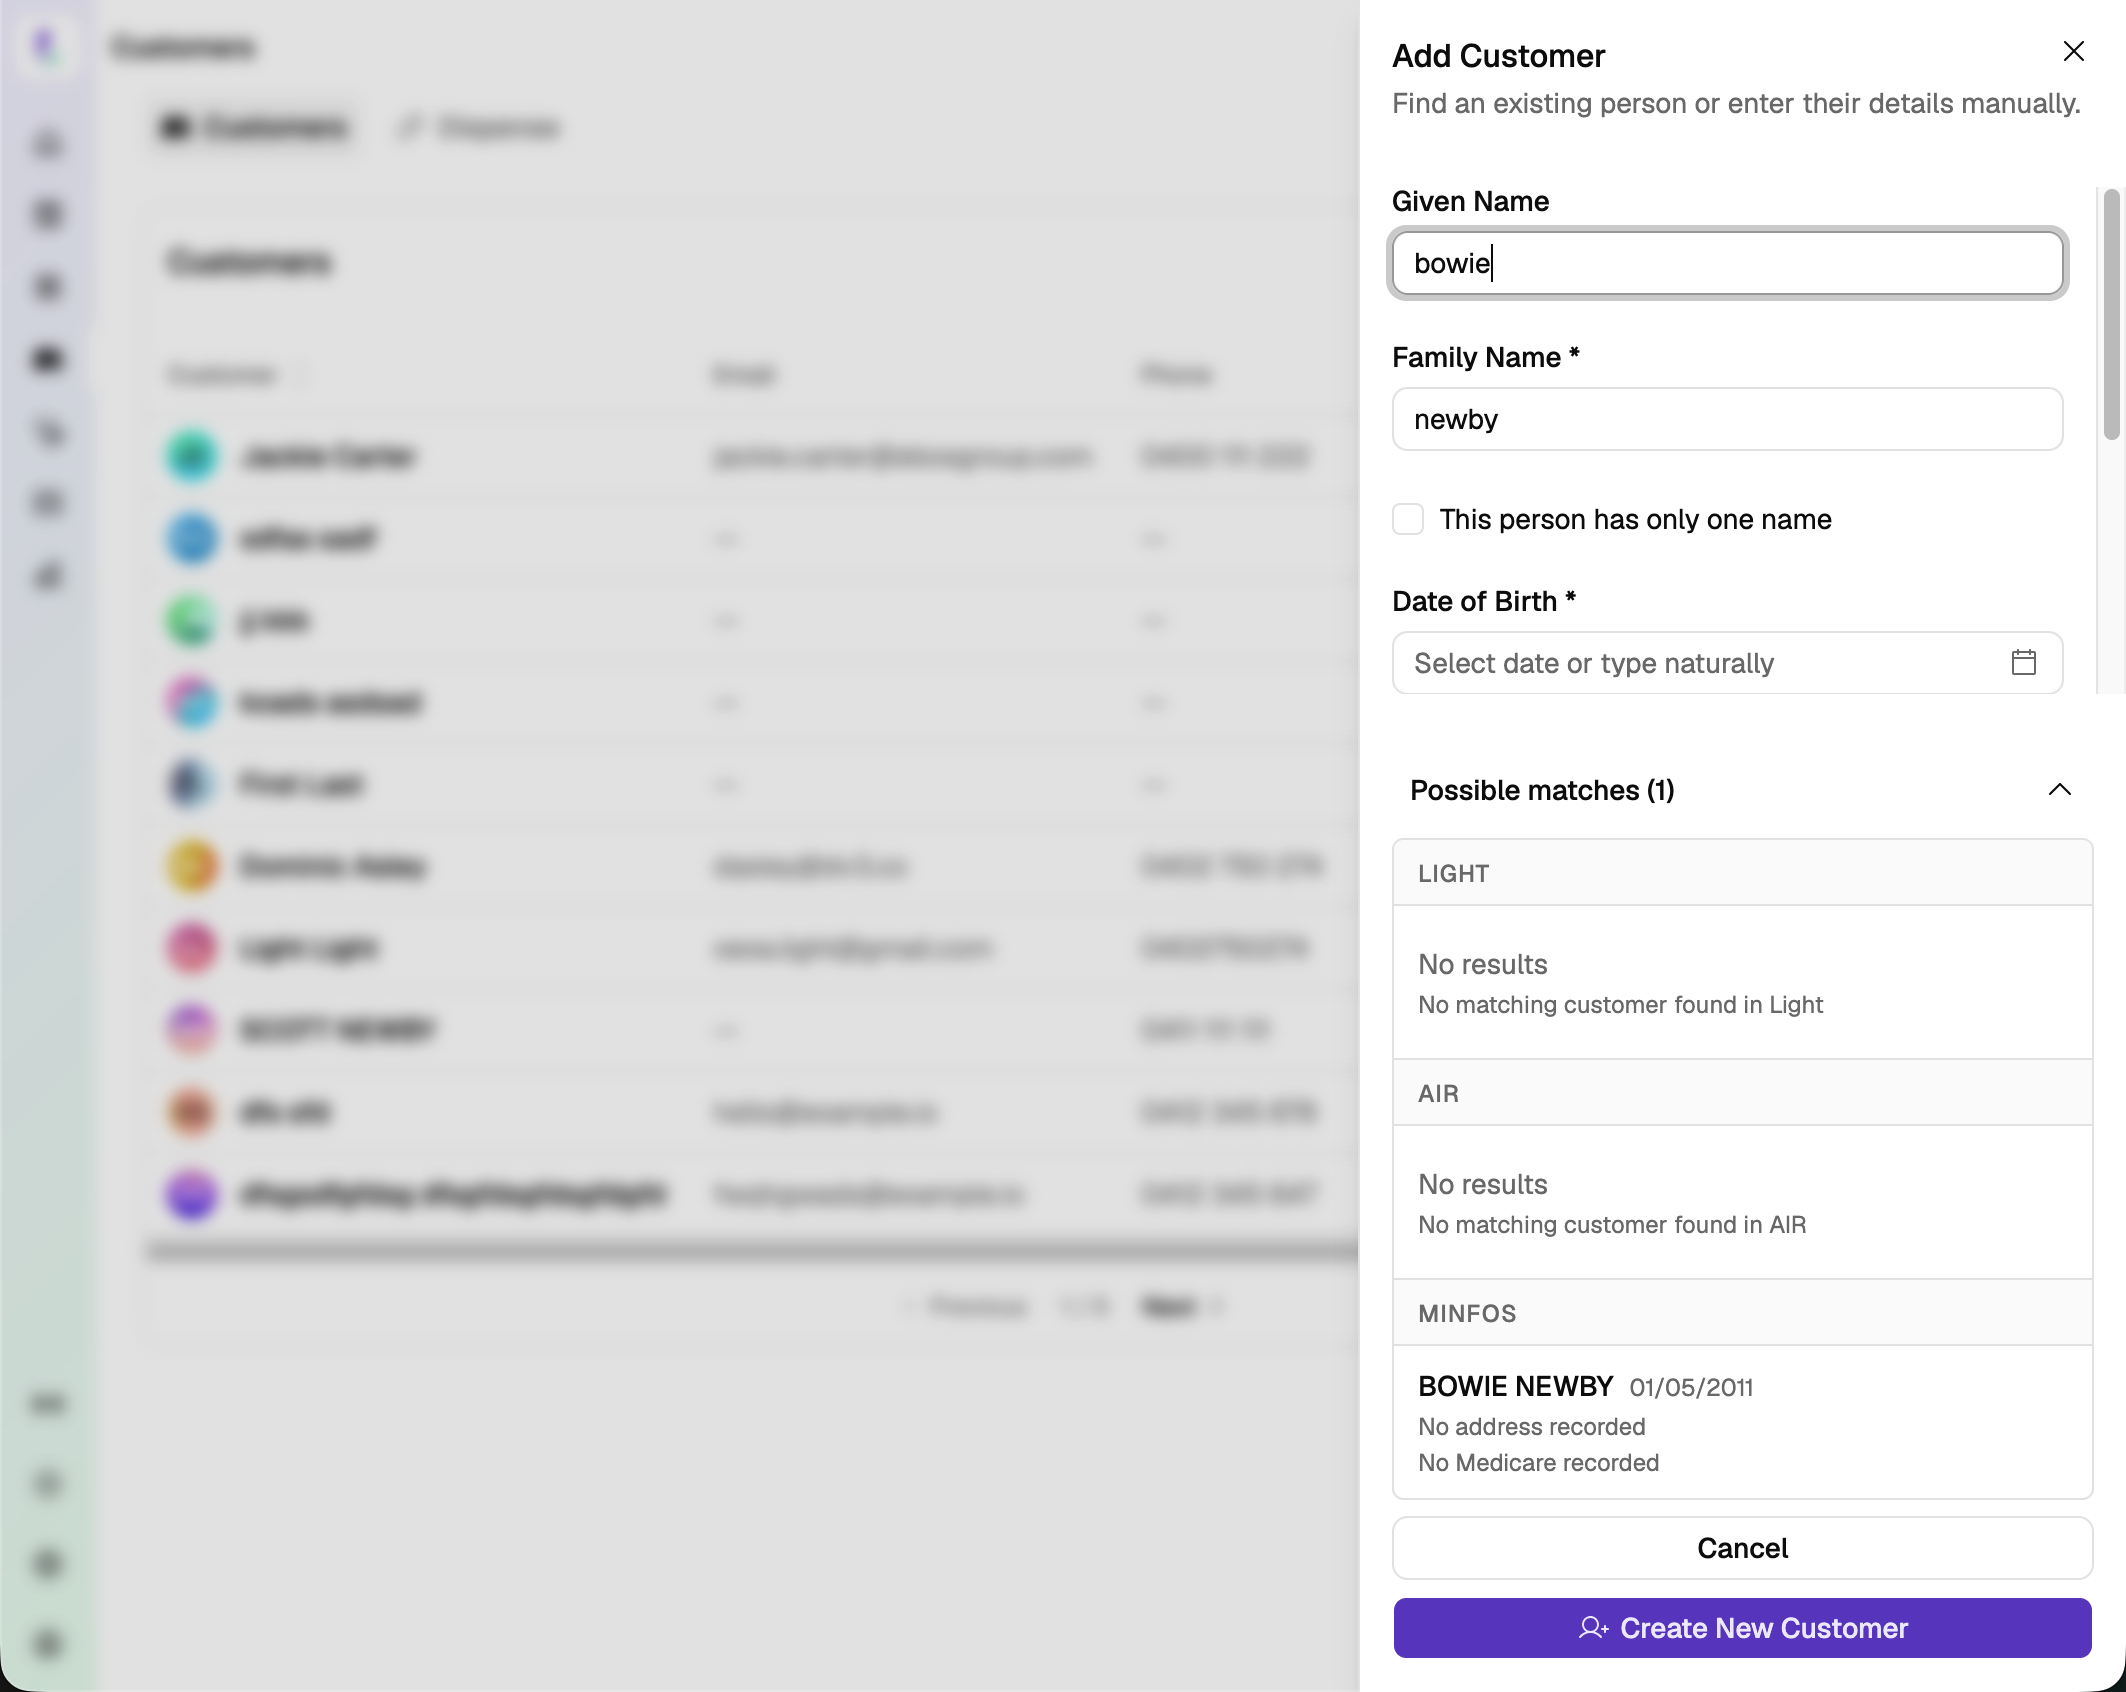
Start adding a customer who already exists in your dispense system but hasn't yet been added to Light. If the connection is working, your dispense vendor appears under Possible matches with the customer's record.
- Check their Dispense tab
Once the customer is added, open their record and check the Dispense tab shows their dispense data.
Adding customers from dispense
There are two ways to add a customer so their dispense history flows into Light:
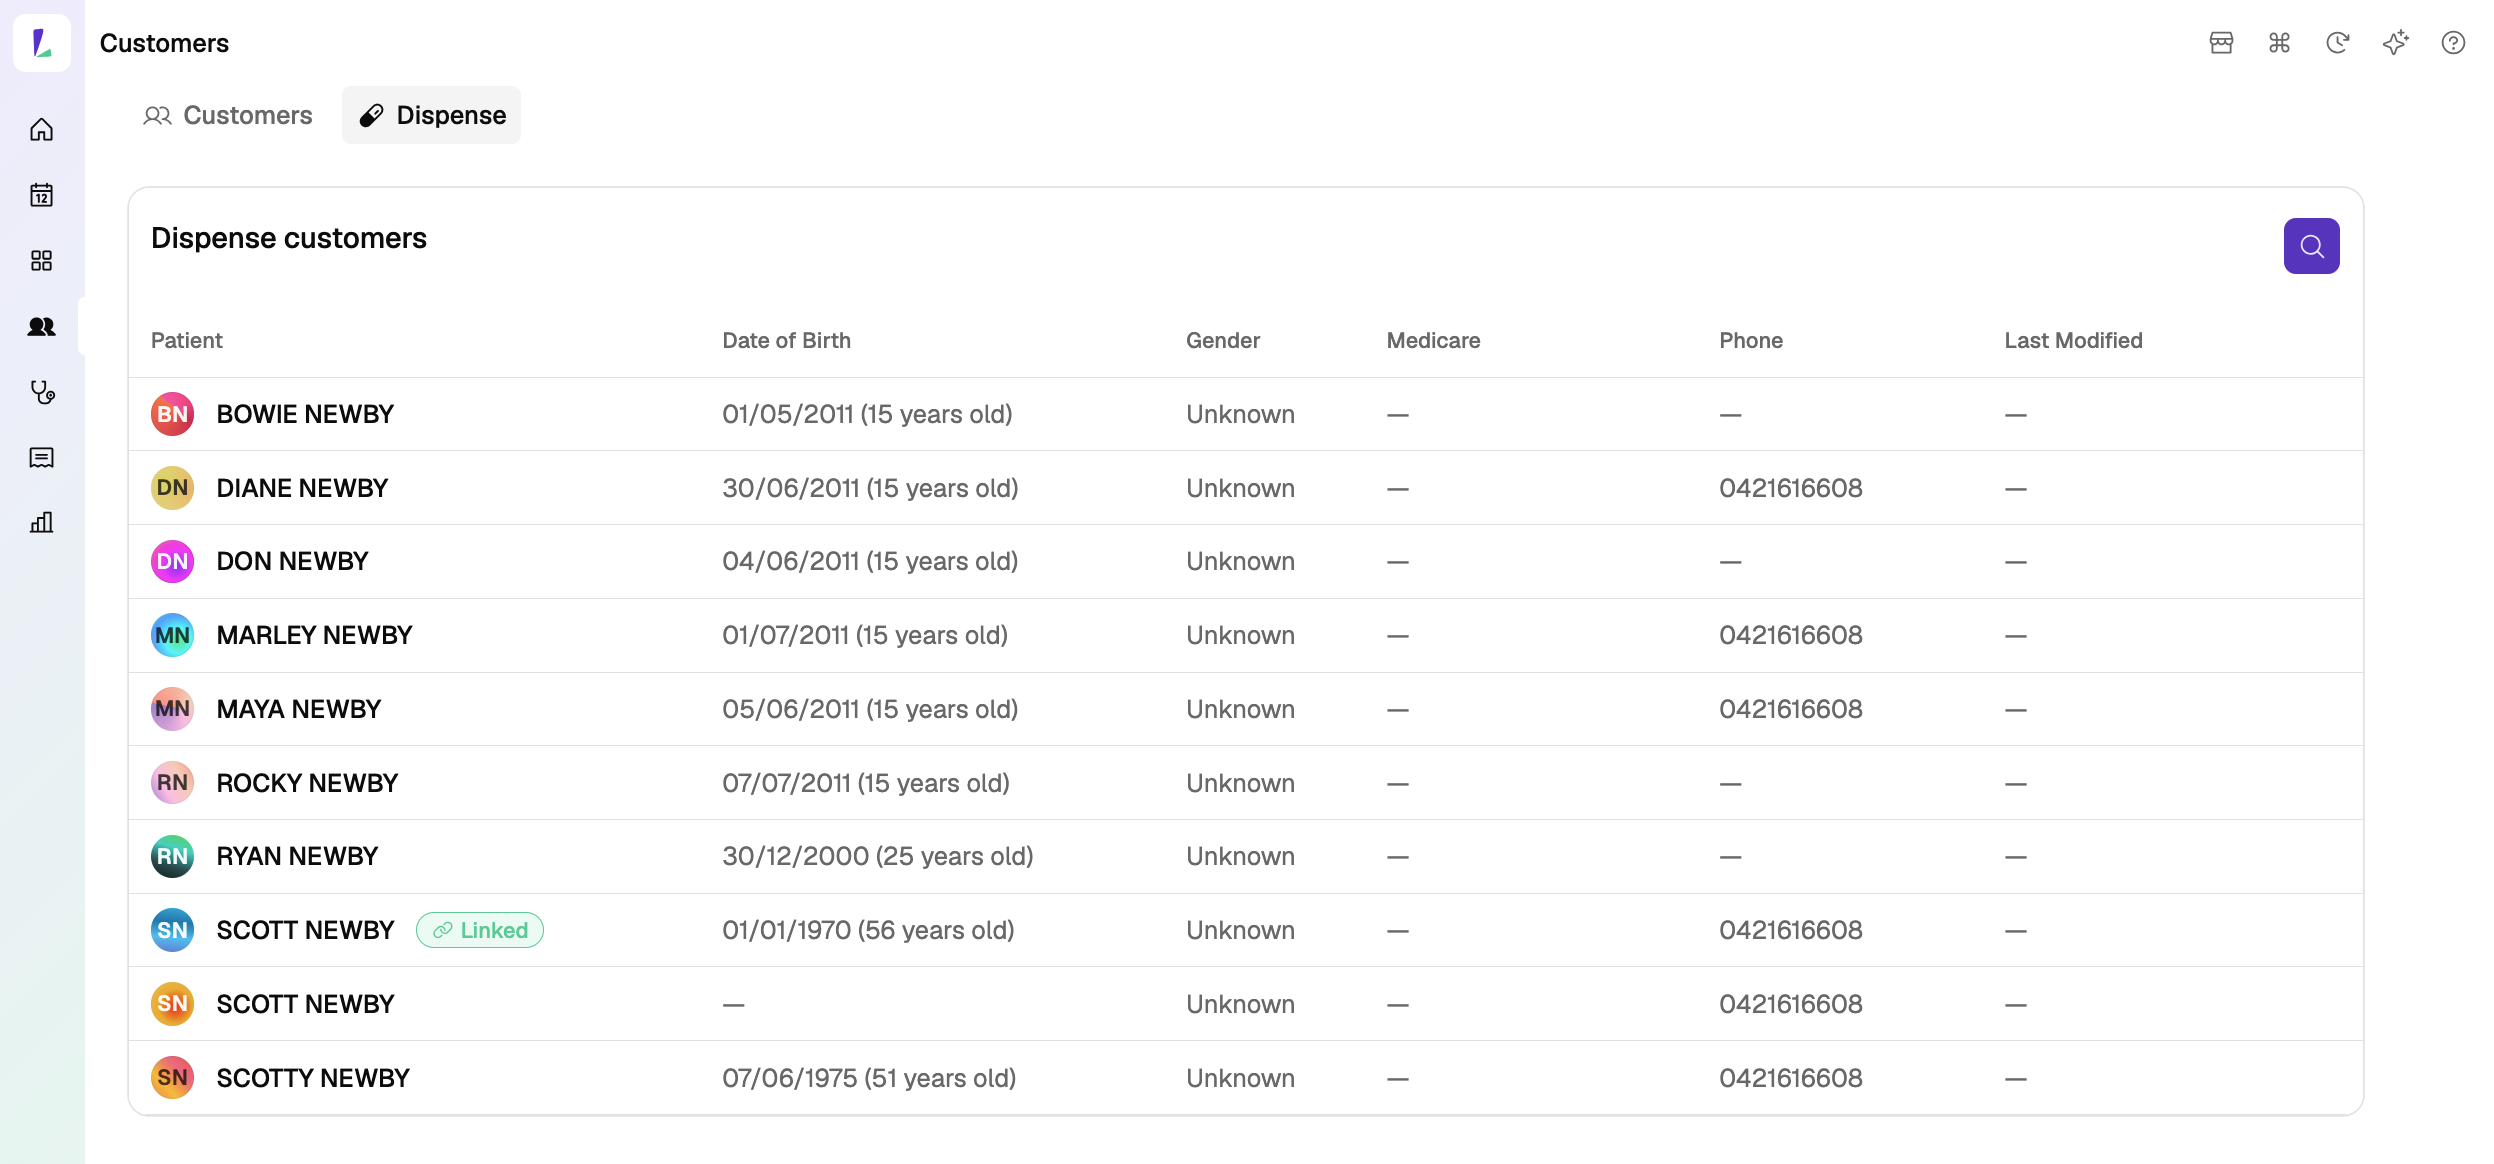
- From the Dispense tab. In Customers, open the Dispense tab to see your Dispense customers. Tap the search icon to find someone in your dispense records – a Linked badge marks anyone already matched to a customer in Light. Select a customer to add them to Light and link their dispense history.
- From Add Customer. When you add a customer, Light searches for matches across Light, AIR, and your dispense system (for example, Minfos), listed under Possible matches. Choose the dispense match to add them with their dispense history attached.
Once a customer is linked, their dispense history appears under the Dispense tab and continues to update automatically. By default the tab shows the last 6 months of dispense history; to see more, change the date filter – you can go back up to 5 years. If a customer hasn't yet been linked, their Dispense tab shows Not linked to dispense – select Link to dispense to match them to the correct patient record.
To disconnect a customer from their dispense record, open their Dispense tab and select Unlink, then confirm. Their dispense history stops updating and the link is removed – you can link them again at any time.
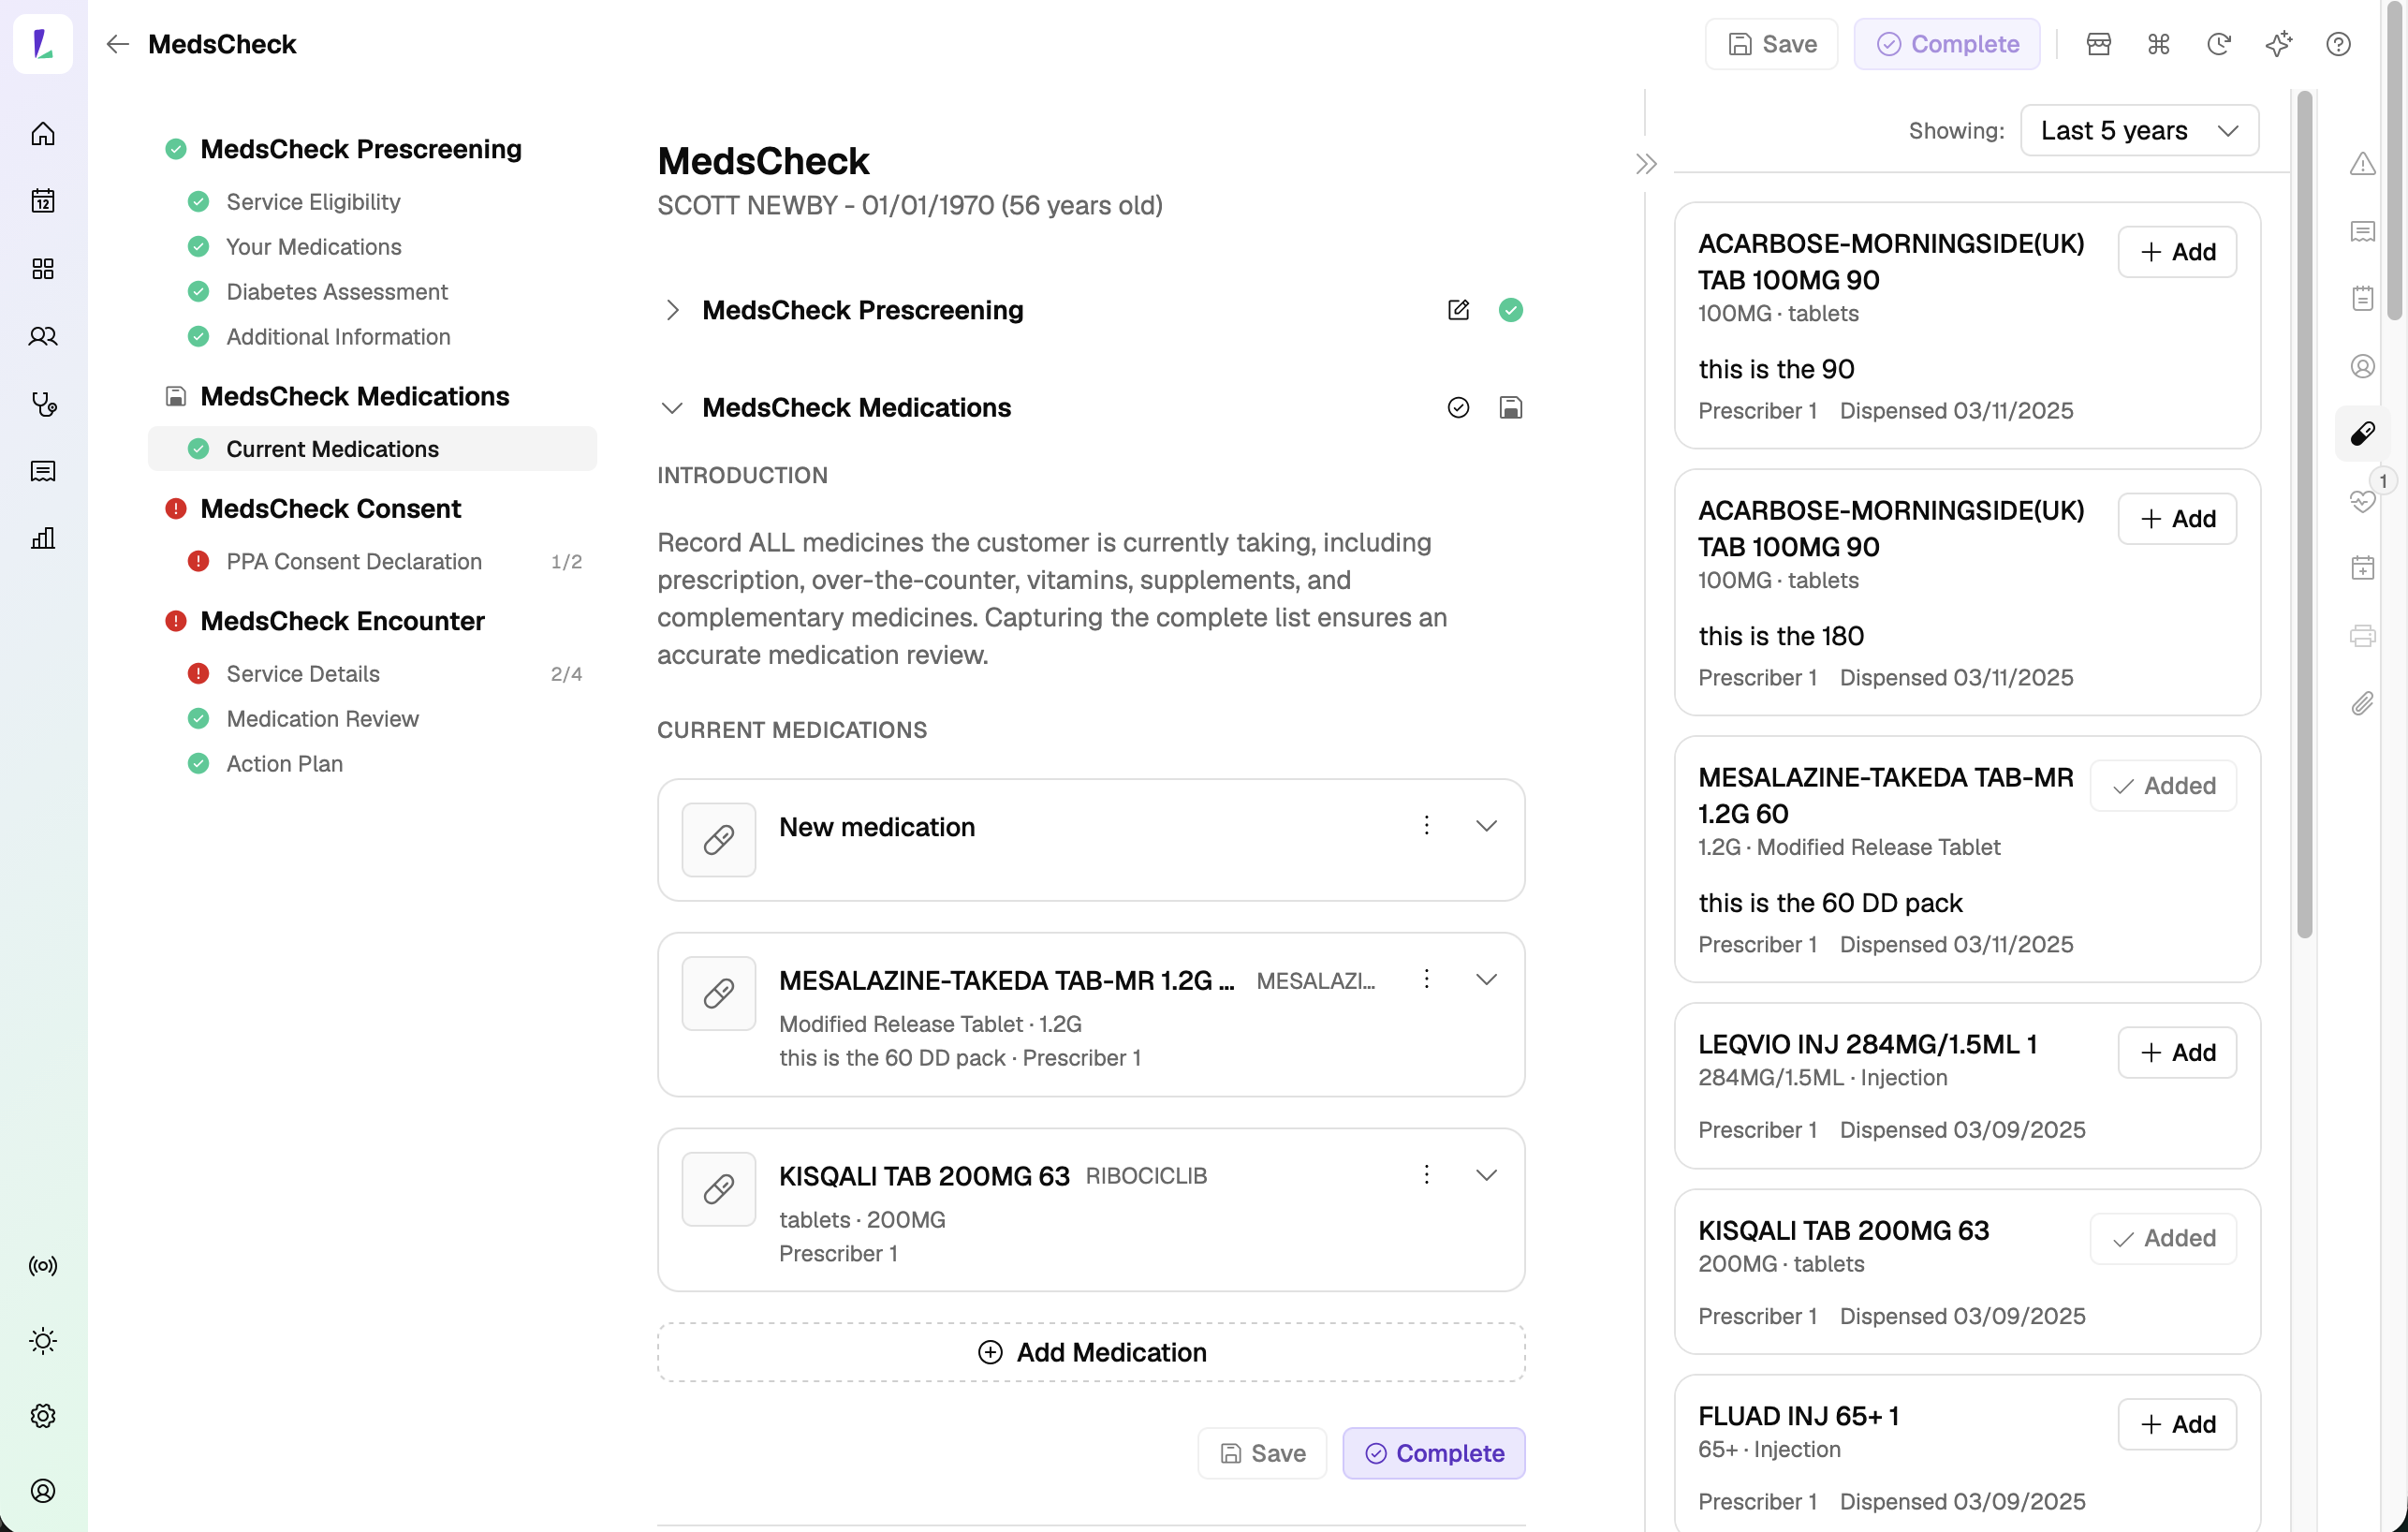
When a customer is linked to dispense, you can also pull their dispense history straight into encounters – open a service like a MedsCheck and the Dispense panel lets you add their dispensed medicines without re-keying.
If you disconnect the dispense integration, the Dispense tab is removed from your customers' profiles until the integration is reconnected.
Changing dispense vendors
- Open the Dispense integration
Go to Settings›Integrations›Dispense.
- Disconnect the current vendor
Open the dropdown next to Re-check and select Disconnect.
- Connect your new vendor
Contact support to connect your new vendor.
Recently dispensed items aren't showing
A completed dispense should normally appear in Light shortly after it's completed. If it hasn't, refresh the view. If it still doesn't appear, go to Settings›Integrations›Dispense, check the Last checked time, and tap Re-check.
Troubleshooting: it's not connecting
Open Settings›Integrations›Dispense to check the status. Common causes:
- Vendor setup incomplete – your store hasn't been provisioned by the vendor yet (for Minfos, the Cloud API access request hasn't been completed; for Fred Dispense Plus, the App Store request hasn't been completed).
- Incorrect connection details – the Store ID or other details may not match the vendor's records. Contact support to check.
- Access revoked – the vendor has revoked access.
- Expired credentials – the connection credentials have expired and need to be re-linked.
- Vendor downtime – an outage on the vendor's side.
What to do: confirm your store has been provisioned by your vendor and that access hasn't been revoked, use Re-check to re-test, and if the issue persists, contact support.
For PRODA and PPA connection problems, see Troubleshooting integrations.